
Today, middle school students are constantly connected to the world around them through the Internet — for better and worse.
On one hand, this gives students amazing access to the world’s largest knowledge database. But it’s also scary since middle school students may not grasp the principles of internet safety.
After all, the Internet is a double-edged sword. It lets us see, research, and understand the world — but the world can see us back. That’s a scary thought, especially when it applies to middle school children.
So how do you make sure your students know how to stay safe online? You have to teach internet safety.
The best way to do that is to lay foundation for your students’ understanding of safe behavior online.
The seven internet safety topics you should teach in middle school are:
- Verifying someone's identity
- Verifying a link is safe
- Identifying an online scam
- Protecting privacy
- Creating and using passwords
- Identifying, not participating, and stopping cyberbullying
- Becoming a good digital citizen
In this blog, we'll explain these topics and give you some ideas for teaching them.
Let's get started!
Step 1. Verifying Someone’s Identity (Anti-Catfishing)
Social media is everywhere online. New social networks crop up by the month, and some of them may fly under the radar of adults while they catch the attention of middle-school aged children.
For example, everyone has heard of Facebook, Twitter, and TikTok.
But have you heard of Minds, Ello, Stage 32, Spring.me, Cucumbertown, Diaspora, Wooxie, or Yookos?
If you have, you’re in the minority of adults aware of just how many social networking options are available online. You’re also probably aware of just how easy it is for someone to lie about who they are online.
This practice is called “catfishing,” and it involves one person creating an elaborate fake identity to trick or manipulate someone else.
At best, catfishing is an embarrassing prank friends play on one another. At worst, it’s an attempt to steal someone’s identity, blackmail them, cyberbully them, stalk them, or even physically hurt them.
So what should students do if they get a friend or follow request from someone they don’t know on social media? And what should they do if they think one of their online friends is actually an imposter?
It’s fairly easy and fast to do this — you just need to know how!
1. Search the Person’s Full Name on Google
If they show up in multiple places with multiple social media profiles, that’s a good indicator that someone is who they claim to be.
You can also click on trustworthy websites to see if someone looks the same in photos on one social network as they do on another.
2. Reverse Image Search Someone’s Profile Photo
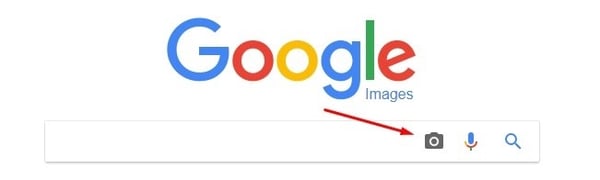
Google has a reverse image search function that lets you upload an image to search online. Using the reverse image search can be one of the more fun ways to teach internet safety in middle school.
You have to go to images.google.com and click the camera icon in the search bar.
Then, you’ll get two options for searching an image — paste a URL or upload an image.
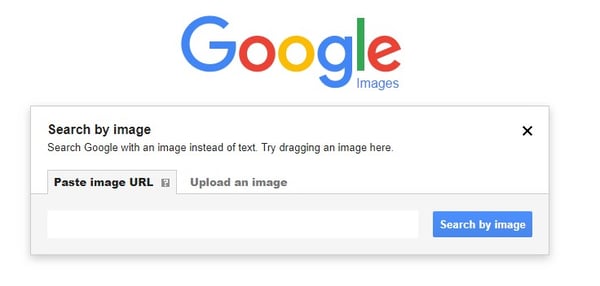
To search, you have to save someone’s photo to your computer and upload it to Google’s reverse image search. You can also copy the image’s URL by right-clicking on the image and clicking the “Copy Image Address” option.
If an image comes back with a lot of copies from a lot of different websites, it’s bad news.
Profile photos are almost always unique on social media, so it should be concerning if you see that someone’s profile photo is used on a stock image website or the same social network multiple times.
3. Block Them
When in doubt, give students the one big piece of cyber safety advice they’ll never forget — block the stranger.
In fact, they can do this immediately to reduce the risk that someone is actually tricking them.
When someone is blocked on social media, it often means they can no longer see your students’ posts, friends, or other associations.
That stonewalls the online imposter, and it keeps your students from disclosing any other information to a stranger.
But identity is just one piece of the puzzle. When you want to teach internet safety, you also have to warn students about non-human dangers — like malware.
Step 2. Verifying a Link Is Safe

If a student has access to a computer or smartphone, the odds are good that they have an email account.
That email account should be secure — that’s the goal of every email provider — but every student is still vulnerable to spam and scams.
Sometimes, these unsolicited messages simply ask for money. There’s an easy way to respond to those — delete the emails.
But hackers and malicious Internet users become more cunning every year. Their attempts at hacking have fooled everyone from retirees to cutting-edge IT professionals and everyone in-between.
The main way hackers do this is through link falsification, sometimes called spoofing. This is the act of creating a hyperlink that says it’ll send someone to one webpage, but it actually sends them to another.
That webpage may be programmed to automatically install malware on someone’s computer or phone. It may also install something called a “keylogger” that tracks the keystrokes you make and reports them back to an unknown individual who can learn your usernames and passwords.
It may even do something as innocent as asking for the security question to a specific account you own.
Regardless of the shape it takes, these are all dangerous links. So how can students stay safe from them?
1. Hover the Cursor over the Link before Clicking
This is the simplest way to verify if a link is legitimate or not.
Hover your mouse cursor over the link (or image, in some cases) and look at the URL that pops up. It’s important to keep your cursor motionless at this point, otherwise the URL will disappear.

If you recognize the URL, that’s a great sign!
If you don’t, then don’t click!
2. Read the URL Carefully
Online scammers know how easy it is to make an “r” and an “n” look like an “m.”
That may not sound like much — but it makes an enormous difference when you’re looking at URLs like:

One of those URLs goes to a well-known and long-established bank in the United States.
The other one is an imposter website that could do anything from installing ransomware on your computer to downloading your browser history.
Fortunately, there’s a way to help your students avoid this danger altogether. You can teach them how to identify an online scam.
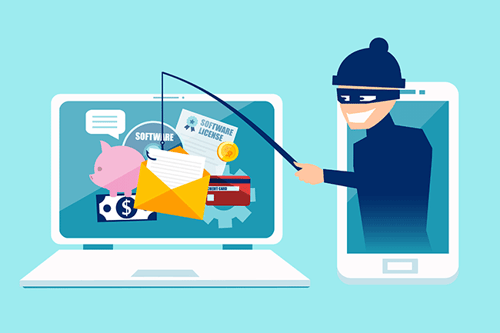
Step 3. Identifying an Online Scam

While scammers upgrade their tactics for every new scheme, they can’t beat the one thing that almost everyone feels when they encounter a scam: a gut feeling.
The best way students can avoid a scam is to go with what they feel. If a website they’ve never heard of is asking for their information, then they need to be safe and leave the website.
This is also true for individuals who may contact students via social networks or email. If students don’t recognize someone’s name — or if they haven’t validated someone’s identity — then they need to stay away.
It’s incredible what a small piece of personal information can do in the wrong person’s hands.
Here’s what you can teach your students to give them the right “gut feeling” when they encounter a fishy situation online.
1. Money Is Involved
Any time an unsolicited message from any source mentions money, it’s best to ignore the message.
As a general rule, the institutions who have access to your personal information will rarely discuss it over email.
This is true for both requests for money and requests to give you money. They both require you to give out personal information, like bank account numbers, which scammers can use to empty your account without a trace.
Often, scammers like to combine requests for money with some sense of urgency so that you act before you have a chance to think about the message itself. Don’t be fooled — if you or your students don’t recognize someone’s name, company, email address, or anything else, delete the email. Don’t even open it!
2. Fear and Threats
Fear is an incredible motivating factor in any context. This is unfortunately true for scams as well.
Scammers will attempt to use harsh language and threats of penalties to get you to click links, reply with information, and more.
If someone’s threatening you — even if it’s written with “official”-sounding language — they’re probably lying.
3. “We Need Your Information to Proceed”
If someone is asking you for personal information over email or social media, it’s a scam.
No company does this. Still, it’s one of the most effective scam tactics out there.
To keep your students safe, make sure they recognize that their personal information is their personal information. If someone’s asking for it, they’re up to no good!
But this all still feels pretty dangerous, especially for middle school students.
How can you protect their readily-available information, like email addresses and phone numbers, when all of that is available at the drop of a hat online? It comes back to protecting students’ privacy in the first place!
Step 4. Protecting Privacy (Especially on Social Media)

In an era of smartphones and social media, there have never been more ways to contact someone.
There have also never been so many ways to find someone. Frighteningly, few of these methods require your consent in order for someone to find you.
That includes your students, too.
While many social networks don’t allow anyone under the age of 13 to sign up, they do nothing to stop people from lying about their ages.
So your class of 6th graders could all be on social networks, even if they’re not old enough from a policy standpoint. No one can really stop them since it only takes 30 seconds to get an account, and (even worse) no one is going to take their profiles down.
How can you help your students stay protected when they can sign up for these social networks without anyone else even knowing?
1. Social Networks Have Privacy Settings
Because of outcry against the way social networks collect user data, they now have privacy options that allow you (and your students) to limit what others see online.
Some social networks call these “privacy settings,” and others may call them “security settings.”
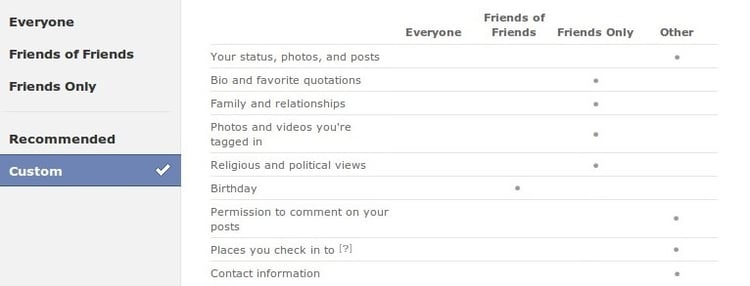
Regardless, they allow you to block other users from seeing your email address, home address, phone number, date of birth, and more.
If your students already use social media, the next thing they need to do is set up their privacy settings.
This is important because most networks don’t have privacy settings enabled by default. You have to change them yourself, and you have to change them immediately.
2. Signing Up for Social Media with Dummy Email Accounts
The rise of free email services has made it possible for students to sign up for multiple email accounts at a time.
These email accounts can have usernames and information that are complete gibberish. Most email platforms will allow them to create an email account without ever asking why or how often they’ll use it.
If students sign up for an email account with a fake name and then sign up for a social network using that email account, they’re adding another wall between themselves and strangers on social media.
Best of all, that email account is effectively useless in the event a social network is hacked or sells its users’ data to another company.
3. Deny and Turn Off Location Settings
One of the biggest dangers of social media is that it tells everyone where you are whenever you post something.
Your parents know. Your friends know. And the cyber-stalker you didn’t know you had also knows.
This is an exceptionally dangerous feature for middle school students. It empowers anyone to know where they are with the tap of a screen or the click of a link. Almost every social network offers these options.
If students truly want to keep themselves safe, they need to turn off location services and modify their posts to not show their location. If they don’t, it’s crucial that you stress to students just how dangerous these features are.
As a rule, they should also turn off their location settings on their smartphones, if they have one.

Sometimes, social networks will automatically pull smartphone location data to add to a post.
It’s not quite ethical, but students need to know about this so they don’t broadcast their location every moment of every day.
Speaking of keeping information private, there’s more to it than just changing settings in social networks and smartphones.
If students truly want to stay safe online, they need strong passwords.
Step 5. Creating and Using Passwords

Passwords are the verification method of choice for anyone who has an account with any company or application.
The upside to passwords is that they’re easy to remember. After all, they’re just a few letters and numbers on the keyboard.
The downside to passwords is that it’s easy to make one that a hacker can guess or figure out!
As a result, it’s essential that your students learn how to create and use passwords effectively. Thus, creating secure passwords can be one of the most important internet safety activities for middle school students.
Overall, passwords are a pretty strong way to keep accounts secured from outside users. That’s why scammers have to figure out clever ways to reset your password or work around your current security settings on an account.
But to really use them well, students have to know the best ways to keep their accounts safe online.
1. Use a Password You Can Remember, but No One Can Guess
This is the essential “trick” to creating a password. It has to be something you can remember, but it can’t be something someone can guess.
The best way to do this is to think of something that’s completely weird or unique — even if it’s nonsensical gibberish — and remembering exactly what that is.
In general, students should stay away from using names or ideas that they like. The strongest passwords will have absolutely nothing to do with them personally, which will make it all but impossible for hackers to guess.
Strings of unrelated words combined with random characters, numbers, and capitalization tend to work great.
Let’s use an example to see how you and students can make powerful passwords.
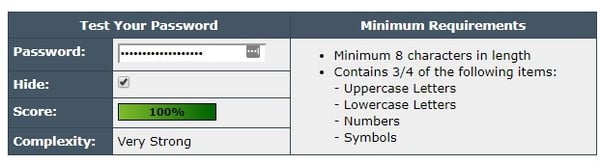
String of unrelated words: anvilmobysaunaduck
With random characters: @nvilm()bysaunaduck
With random numbers: @nvi1m()bysaun4duck
With random capitalization: @nvI1m()bYSaun4duCK
By all accounts, that’s a strong password!
But creating a strong password is only half the battle!
2. Creating a New Password for Every Account
If you talk to anyone — literally anyone — there’s a really good chance that they reuse at least one password for multiple accounts they own.
This is exceptionally dangerous. It means that one password can give someone access to multiple parts of your life, which is especially bad for children.
This makes it easy for someone to impersonate, stalk, or rob you — and by the time you realize what’s happened, it’s almost always too late.
To truly stay secure, use a different password for every account you open!
3. Never Talk about Passwords
If a password is going to do its job, only one person can know it. That means students should never give their passwords away, even to their friends!
This is a pivotal point for students to remember. They may want to share an account for something, but by doing so, they could jeopardize other accounts they own.
To truly be safe, only a student can know their passwords for anything — even school accounts.
But internet safety for students goes beyond technical concepts like passwords. It also deals with students’ social behaviors — namely, cyberbullying.
Step 6. Identifying, Not Participating, and Stopping Cyberbullying

Cyberbullying is the process of attacking, insulting, belittling, humiliating, blackmailing, or otherwise harming someone online.
Cyberbullying takes millions of different forms. It could be as simple as a mean tweet. It could be as complex as researching someone’s personal life and publishing a stream of documents online for anyone to download.
Still, it’s not always aggressive behavior that’s characterized as cyberbullying. It could be passive aggressive or something else entirely.
In short, cyberbullying isn’t always cut and dry — but you know it when you see it.
You know it because you can see the impact on a student’s academic and personal life. They may lose friends, lash out, or perform poorly in class.
You may have strategies to deal with this, depending on your school or state requirements.
But the best way to help students with cyberbullying is to teach them how to identify, resist, and stop it.
1. Identifying Cyberbullying
Cyberbullying is best defined broadly in terms of its negative impact on a student or students.
If that student’s peers see cyberbullying happening — even if it looks “innocent” like teasing — it’s important that they know what they’re really seeing.
It’s not just a joke someone’s playing. And it’s not “fake” just because it’s happening over the Internet. It’s actually hurtful.
2. Not Participating in Cyberbullying
Cyberbullying is much easier to identify from a distance than it is up close.
A student may be a part of a group who wants to play a “prank” on another student online.
One way or another, that can quickly turn into cyberbullying. The perpetrators may even think it’s harmless because they’re only seeing their actions from their perspective.
But from the victim’s perspective, it could be a life-changing, devastating event.
So students may know what cyberbullying looks like, but they may not know what it feels like.
In fact, some good kids can wind up hurting someone simply because they don’t grasp the implications of their actions!
Students have to know empathy in order to really understand how that works. This isn’t easy — especially because Internet communication tends to dehumanize people since you don’t get to hear someone’s voice or look them in the eye.
Nevertheless, it’s essential to understand so students don’t become cyberbullies.
3. Stopping Cyberbullying
Stopping cyberbullying is easy on paper. Stopping cyberbullying in practice takes courage.
That’s because it requires students to stand up for someone or something that isn’t seen as popular. And in middle school, popularity is everything.
Teaching students how to take a stand or understand why they should defend someone who’s being victimized can go a long way in turning them into anti-bullying advocates. As news has shown us, it may even save someone’s life.
Step 7. Becoming a Good Digital Citizen

You can wrap up your course or unit about internet safety with lessons on becoming a good digital citizen.
Digital citizenship is all about knowing how to act online. It requires students to think about how their actions are perceived, how someone may view them, and how they can protect themselves.
It’s the perfect end-of-course topic for middle school students who need to learn how to act ethically and responsibly online.
Fortunately, this is one of the easier concepts to introduce as a teacher and understand as a student. That’s because there are plenty of examples available for every part of digital citizenship.
1. Cover Digital Literacy
Digital literacy focuses on how students understand and interpret information online. That means understanding the machines behind publishing, why people publish information online, how to identify misinformation, and more.
It’s a valuable 21st Century skill that students need to know in today’s tech-centric era. After all, the rate of new gadgets and technology isn’t slowing down. With that kind of technology here to stay, students need to understand what they’re seeing online.
2. Talk about Communication
In a nutshell, people don’t talk the same way online as they do in person. The medium of the Internet may take the anxiety out of social situations, allowing them to express themselves more freely.
It may also make it easier for someone to exaggerate their feelings in the hope that they convey an idea that’s not actually as intense as it sounds. This is crucial to cover so students don’t overstate (or misstate) themselves.
It’ll especially come in handy in their future careers, too. After all, email is the backbone of corporate communication!
3. Emphasize Empathy
The key to being a good digital citizen is empathy. This comes down to one big question every student should ask themselves before they post anything online:
“What would I think of someone who posted this?”
This question alone can change someone’s actions and — by extension — someone else’s life.
